Butter Yellow Nails: The Sunny Trend Taking Over 2024
Have you scrolled through social media or walked down a city street and noticed a surge of perfectly polished, sunny manicures that look like a dollop of creamy butter? That, my friends, is the butter yellow nails trend, and it’s officially everywhere. It’s not the bright, neon lemon of summers past; this is a softer, warmer, more sophisticated shade that feels both nostalgic and freshly modern. But what exactly is it about this particular hue that has captured the hearts of nail art enthusiasts, celebrities, and fashion editors alike? Why does this specific yellow feel so universally flattering and endlessly versatile? Let’s dive deep into the world of butter yellow nails, exploring everything from its exact color definition to how you can master this sunny look at home.
This trend represents a shift towards effortlessly chic, low-maintenance glamour. It’s a color that whispers confidence rather than shouts it, making a statement without trying too hard. In a world of ever-changing nail trends, butter yellow has proven to have remarkable staying power because it bridges seasons, styles, and age groups. Whether you’re a minimalist who loves a sheer wash of color or a maximalist who adorns your nails with intricate art, this shade provides the perfect, sunny canvas. This comprehensive guide will unlock all the secrets to achieving and styling the perfect butter yellow manicure.
What Exactly Are Butter Yellow Nails?
Decoding the Color Profile
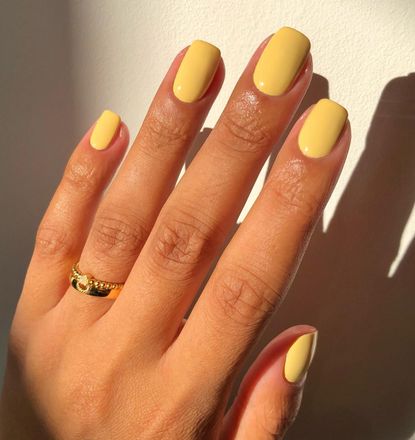
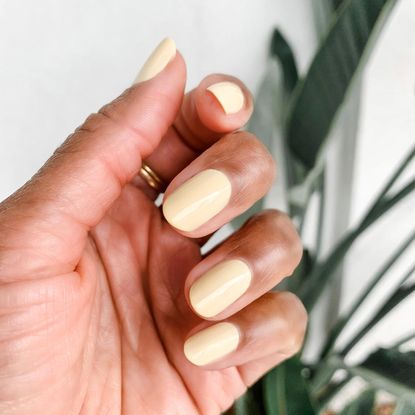
Butter yellow is a specific, nuanced shade within the yellow family. Think of the color of unsalted butter at room temperature—a pale, creamy, warm yellow with a distinct softness and depth. It sits between a pastel yellow and a mustard yellow, but it lacks the acidity of a lemon or the earthiness of a ochre. Its key characteristic is its creamy opacity; it’s not translucent like a sheer jelly polish, but it’s not a solid, matte block of color either. This creamy quality is what gives it its luxurious, salon-finished appearance. The color often has subtle undertones—sometimes a hint of peach or apricot, which is what makes it so flattering on a wide range of skin tones. It’s a warm, inviting yellow that feels cozy and optimistic without being overwhelming.
How It Differs from Other Yellow Nail Polishes
The world of yellow polishes is vast. To truly appreciate butter yellow, it’s helpful to distinguish it from its cousins:
- Lemon Yellow: Bright, sharp, and often has a slight green or white base. It’s vibrant, summery, and can be challenging to pull off without looking stark.
- Canary Yellow: A pure, saturated primary yellow. It’s cheerful and bold but can sometimes appear flat or too intense on the nails.
- Mustard Yellow: A deeper, earthier yellow with strong brown or olive undertones. It’s autumnal and sophisticated but lacks the light, airy quality of butter yellow.
- Pastel Yellow: A very light, often more white-based yellow. It can be lovely but may lack the creamy richness and opacity that defines the butter shade.
Butter yellow masterfully balances warmth and softness. It provides enough pigment for excellent coverage and a statement look, but its muted, creamy base prevents it from ever looking garish. This balance is the cornerstone of its widespread appeal.
The Cultural and Fashion Rise of Butter Yellow
From Runways to Real Life: A Celebrity and Designer Favorite
The ascent of butter yellow nails wasn’t an overnight accident; it was a gradual crescendo fueled by fashion’s biggest names. Designers have long used warm, buttery yellows in their collections for their association with optimism, luxury (think of golden threads and butter-soft leathers), and a fresh, modern take on neutrals. This inevitably trickled down to beauty trends. Celebrities and influencers have been pivotal in popularizing the specific nail shade. Stars like Hailey Bieber, Zendaya, and Blake Lively have been spotted with variations of this creamy yellow manicure, often paired with minimalist gold jewelry or sleek, monochromatic outfits. Their adoption signaled that this was a "in-the-know" trend—effortlessly stylish and red-carpet ready. It became the go-to manicure for fashion month, seen on models and editors alike, cementing its status as a must-try shade.
The Social Media Amplification Effect
Platforms like Instagram, TikTok, and Pinterest have been rocket fuel for the butter yellow nails phenomenon. The hashtag #butteryellownails boasts millions of views, filled with tutorials, salon shots, and user-generated content showcasing the shade’s versatility. Nail artists on TikTok have popularized specific application techniques—like the "reverse French" with a butter yellow tip or intricate floral designs on a butter yellow base—that have gone viral. The shade is incredibly photogenic; it looks warm, glowing, and healthy in pictures, which encourages sharing. This created a powerful feedback loop: people see it, try it, share their results, and inspire others. It has also been categorized within broader trend cycles like "dopamine dressing" (using color to boost mood) and "quiet luxury" (subtle, high-quality staples), giving it even more cultural relevance and searchability.
How to Achieve the Perfect Butter Yellow Manicure at Home
Essential Tools and Prep Work for a Salon-Finish
Achieving that flawless, creamy butter yellow look at home is absolutely possible with the right prep. The secret to any great manicure is in the foundation. Start with clean, filed, and shaped nails. Push back and gently remove any cuticles—this is non-negotiable for a neat finish. Lightly buff the nail surface to remove shine; this helps the polish adhere better and prevents chipping. Next, use a purple or blue-based nail polish remover (not acetone) to wipe each nail. This removes any lingering oils or residue that can cause polish to bubble or peel. A proper base coat is crucial. Opt for a sticky, gel-like base coat or a dedicated ridge-filler. This creates a smooth, even surface and prevents staining from the yellow pigment. For butter yellow specifically, a white or opaque base coat can be used if you want to maximize the polish's true color and opacity, but a good neutral base is often sufficient.
Step-by-Step Application for Flawless, Opaque Color
- First Coat: Apply your chosen butter yellow polish in thin, even strokes. Don’t overload the brush. Start with one swipe down the center of the nail, then one on each side. It’s better to do two thin coats than one thick, gloppy one. Don’t worry about full opacity on the first coat.
- Second Coat: After the first coat is touch-dry (about 2-3 minutes), apply the second coat. This is where you’ll build to that perfect, creamy, opaque color. Use the same technique. Pay special attention to the tip and the cuticle area to avoid pooling.
- The Third Coat (If Needed): Some butter yellow polishes are highly pigmented and achieve full coverage in two coats. Others, especially those with a more sheer, jelly-like finish, may need a third thin coat to reach that rich, buttery opacity. Assess after the second coat.
- Top Coat: This is the most important step for longevity and shine. Apply a high-shine, quick-dry top coat in thin, even strokes, sealing the tip of the nail well. A good top coat protects your color from chips and scratches and adds that glassy, professional finish. For an ultra-smooth, salon-like result, consider a UV/LED gel top coat if you have a lamp, as it provides the hardest, glossiest seal.
Pro Tips for a Professional-Looking Manicure
- Clean-Up is Key: Use a small, angled brush dipped in nail polish remover to tidy up any mistakes around the cuticles immediately after applying your top coat. This makes the manicure look instantly neater.
- Temperature Matters: Apply polish in a room that’s not too cold. Cold temperatures can cause polish to thicken and apply streaky.
- The "Fan" Technique: After applying polish, lightly "fan" your nails with your hand or use a mini fan to speed up drying and prevent dust from sticking.
- Moisturize: Once completely dry (wait at least 15-20 minutes), apply cuticle oil and hand cream. This final step adds a touch of luxury and keeps your hands looking as good as your nails.
Creative Butter Yellow Nail Art and Design Ideas
Minimalist Elegance: Let the Shade Shine
The beauty of a perfect butter yellow is that it often needs no adornment. A simple, glossy, single-shade manicure is a complete look. For a minimalist twist, try:
- The Negative Space Manicure: Leave the base of the nail (near the cuticle) bare or painted with a sheer nude, coating only the tip in butter yellow. It’s modern and chic.
- Subtle Accent Nail: Paint all nails with a sheer pink or beige, and make one finger (ring finger or thumb) your statement butter yellow.
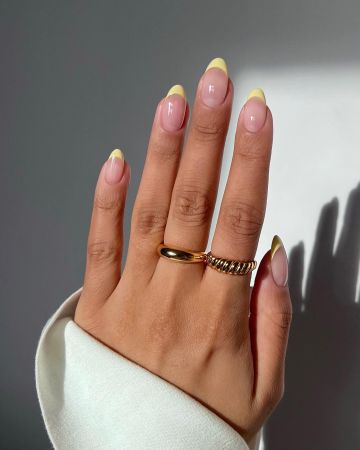
- Thin French Tip: Replace the classic white French tip with a soft butter yellow. Use a thin striping brush or nail art tape for precision. It’s a fresh, sunny take on a timeless design.
Bold and Playful Patterns on a Sunny Canvas
Butter yellow is an exceptional base for nail art because its neutral-yet-warm tone makes other colors pop.
- Floral Designs: Tiny white daisies, delicate cherry blossoms in pink, or abstract floral strokes in coral look stunning against the creamy yellow. Use a detail brush or dotting tool.
- Geometric Shapes: Graphic lines, squares, or triangles in black, white, or navy create a striking contrast. A half-moon design at the cuticle (reverse French) in a contrasting color is very on-trend.
- Fruit and Food Art: This shade is perfect for lemon slices, pineapples, or even abstract butter pats. The color connection makes the art feel cohesive and fun.
- Glitter and Metallics: A dusting of fine gold or champagne glitter on one accent nail adds glamour. Chunky holographic glitter over a butter yellow base is a festival-ready look.
Making Your Butter Yellow Manicure Last: Maintenance Tips
A Daily Care Routine for Chip Resistance
Longevity starts with application, but maintenance is key. After your manicure is fully cured:
- Wear Gloves: For any household chores involving water or cleaning products, wear gloves. Prolonged exposure to water and chemicals is the fastest way to lift polish and cause chips.
- Be Mindful of "Fiddling": Try to avoid using your nails as tools—for opening cans, scratching off stickers, etc. This puts stress on the tip and leads to peeling.
- Hydrate, Hydrate, Hydrate: Dry, brittle nails are more prone to breaking and chipping. Apply cuticle oil daily and a rich hand cream regularly. Healthy nails hold polish better.
- Top-Up Your Top Coat: Every 2-3 days, apply a fresh, thin layer of top coat just over the existing polish. This reseals the surface, revives the shine, and adds an extra barrier against chips. You don’t need to remove and redo the color.
When and How to Touch Up Like a Pro
Even with the best care, a small chip at the tip is inevitable. Here’s how to handle it:
- Lightly buff the chipped area and the surrounding nail with a fine buffer block to smooth the edge.
- Wipe with remover to ensure it’s clean.
- Apply a tiny amount of your butter yellow polish just to the chipped section. Use a very small brush for precision.
- Seal the repaired area and the entire nail with a fresh layer of top coat. This will blend the touch-up and protect it.
Butter Yellow for Every Skin Tone: Finding Your Perfect Shade
Understanding Undertones is Everything
The magic of butter yellow lies in its adaptability, but finding your perfect match requires a quick lesson in undertones.
- For Cool Undertones (pink, red, blue): Look for a butter yellow with a slight peach or apricot undertone. These warmer, peachy-yellows will counteract any potential sallowness and look harmonious. Avoid yellows that lean too green or mustardy.
- For Warm Undertones (yellow, olive, golden): You can generally wear a wider range. A true, warm butter yellow (with no strong peach or green bias) will look radiant. You can also experiment with shades that have a tiny hint of golden shimmer.
- For Neutral Undertones: You’re in luck! Most butter yellow shades will work for you. Play with intensity—try a softer, more pastel version or a deeper, more opaque cream.
Adjusting Intensity for Your Complexion
If a full-coverage butter yellow feels too bold, don’t abandon the trend! You can adjust the intensity:
- Sheer Jelly Finish: Many brands offer butter yellow in a sheer, jelly-like formula. Apply one or two coats for a subtle, stained-glass effect that’s barely-there but still sunny.
- Mix and Match: Create your custom shade by mixing a drop of butter yellow with your favorite sheer nude or pink polish. This dilutes the color for a personalized, muted effect.
- Focus on Accent Nails: As mentioned, using butter yellow on just one or two nails allows you to enjoy the trend without committing to a full hand of color, which can be a great way to test how the shade feels on you.
Top Product Picks for Salon-Worthy Butter Yellow Nails
Best Butter Yellow Polishes Across Budgets
The market is saturated with gorgeous butter yellow options. Here are top-rated picks:
- OPI "I'm Not Really a Waitress": A cult-favorite, this is often cited as the quintessential butter yellow. It’s creamy, opaque in two coats, and has a perfect warm undertone. (Premium)
- Essie "Butternut": A classic from Essie, this shade is slightly more peachy and pastel, offering a beautiful, softer take on the trend.
- Sally Hansen "Butter Yellow" (from the Color Therapy or Insta-Dri lines): Drugstore gems that deliver excellent pigmentation and a smooth finish at an affordable price.
- Zoya "Pixie": A beautiful, slightly muted butter yellow from a brand known for its wide shade range and vegan formula.
- China Glaze "Sunshine State": A bright, happy yellow that leans more lemon but can be toned with a grey base coat for a butterier effect.
Essential Top Coats and Tools for the Perfect Finish
Your polish is only as good as its companions. Invest in:
- A Quick-Dry, High-Shine Top Coat: Seche Vite Dry Fast Top Coat is a legendary choice. For a gel-like finish without a lamp, try Sally Hansen Insta-Dri Anti-Chop Top Coat.
- A Quality Base Coat: OPI Base Coat, Orly Bonder Base Coat, or any sticky, rubberized base coat will significantly improve adhesion and prevent staining.
- Precision Brushes: A small, angled cleanup brush (like those from Morphe or Sonia G.) is invaluable for tidying cuticles and creating clean nail art lines.
- A Good Nail File & Buffer: A glass or crystal file is gentler on nails than emery boards. A fine-grit buffer block is essential for prepping the nail surface.
Common Mistakes and How to Avoid Them
Streaky Application and How to Fix It
Problem: The first sign of a DIY fail is a streaky, uneven butter yellow manicure.
Solution: This almost always comes from applying polish that is too thick or from using a dried-out polish. Always shake your bottle well before use. Wipe excess polish off the brush on the bottle neck. Apply thin, quick strokes. If you get streaks on the first coat, don’t panic—a second thin coat will almost always even it out. If the polish itself is old and gloppy, it’s time for a new bottle.
Yellow Staining and Discoloration on Nails
Problem: Some darker or heavily pigmented yellows can stain the natural nail bed a faint yellow, especially if you use a clear or sheer base coat.
Solution: Prevention is key. Always use a good base coat as a barrier. If you notice slight staining after removing polish, don’t worry—it’s temporary and will grow out. To speed up the process, you can gently buff the surface of the nail (very lightly!) or use a whitening toothpaste on a soft toothbrush to gently scrub the nail surface. For persistent stains, a pink or nude concealer polish used as a base can neutralize the yellow tint before applying your color.
Conclusion: Embrace the Sunshine
The butter yellow nails trend is far more than a fleeting fad; it’s a testament to the power of a perfectly balanced color. It’s the shade that manages to be both playful and polished, sunny and sophisticated. It works for a casual coffee run, a boardroom presentation, a summer wedding, or a cozy winter night in. Its versatility is its superpower. By understanding the nuances of the shade—its creamy opacity, its warm undertones—and mastering the simple techniques of prep, application, and maintenance, you can unlock a manicure that feels uniquely you.
So, the next time you find yourself wondering about that glowing, buttery manicure you keep seeing, know that it’s a trend built on a solid foundation of great color theory and style. It’s an invitation to embrace a little bit of sunshine, to add a touch of warm, optimistic color to your everyday look. Whether you go for a minimalist glossy finish or a bold floral design, butter yellow nails offer a canvas for creativity that is as universally flattering as it is undeniably cheerful. It’s time to grab your polish, prep your nails, and let a little bit of that creamy, sunny joy shine through your fingertips.